Modifying the electrical installation of a property is always a sensitive issue, as it carries certain risks. However, there are indeed minor improvements, such as installing or changing a switch that many times you decide to carry out without help. In this article, we tell you how to install a light switch step by step.
How to install a light switch
A priori installing a switch may seem like a simple task. However, if the electrical installation has never been tampered with, it can be somewhat complex.
It is convenient to have some experience with electricity. Be that as it may, it is necessary to have certain materials and tools to carry out the installation properly.
Materials and tools
Drill – Pencil – Wire strippers – Mallet – Flat head screwdriver – Switch – Screws and dowels.
Nor should we forget that we are going to manipulate an electrical installation, with the risks that this entails. If we do not want to suffer an accident, we will have to respect a series of safety measures.
Safety measures for installing a switch
Check that the installation is in good condition, especially with regard to the ground connections. Remember that this part of the installation is responsible for grounding the derivations or current leaks that the different devices or appliances may have.
Cuts off the power to the room where the switch is to be installed. If you find it difficult to distinguish in the lightbox which circuit or differential is correct, you can choose to cut the light in general. Check before doing so that there is no risk of any device or appliance being damaged.
And very importantly, keep your hands dry at all times and do not install barefoot or barefoot.
If necessary, you can use a flashlight to improve visibility during installation. And, of course, before drilling any wall, it is necessary to check that there are no pipes or cables behind.
Instructions for installing a switch
Next, we are going to tell you how to install a switch in 5 steps.
Don’t forget that nowadays it is possible to find a wide variety of switches and the steps may vary slightly depending on the model chosen.
1. Prepare the base
The procedure will depend on the type of foundation you have chosen; one can usually distinguish between surface-mounted and recessed-base switches.
In either case, you will first need to detach the cover from the switch. If it is a switch with a surface base, you will probably have to remove some plastic tabs so that the cables can later be passed through.
Once this is done, rest the base against the wall and mark with the pencil, the area where the screws will go.
2. Make the holes
You will need the drill to drill the points that you have marked with the pencil. Then, to fix the base, you will have to insert the plugs (for which you can use a mallet), place the piece and insert the screws.
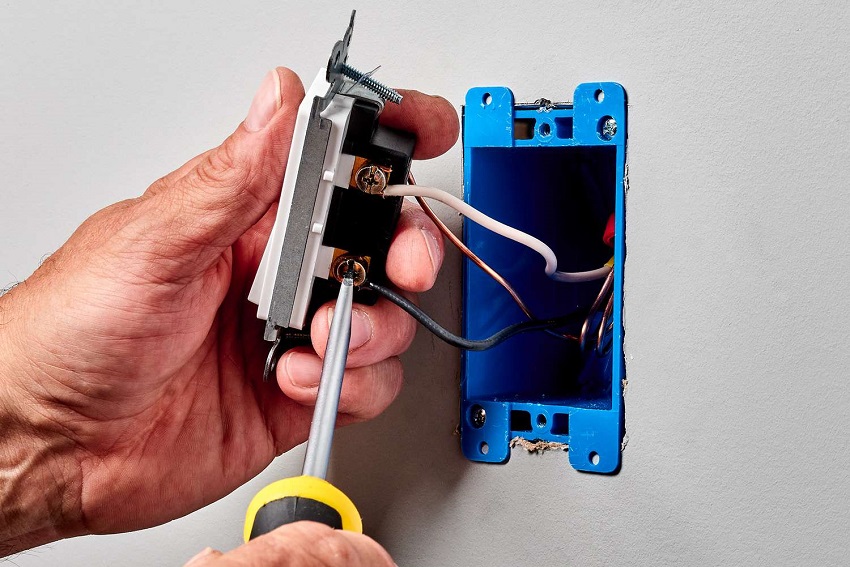
3. Make the connections
This is the key step. It’s all about joining the wires to make the switch work properly. For this, it is recommended to follow these instructions:
Use a wire stripper to remove the plastic from the ends of the base wires.
Connect the wires to the switch in their corresponding slots.
Check that the cables are secure.
How are the cables distinguished?
Normally the different cables have a color associated with them to easily identify them. The phase wire is usually brown or black, while the neutral wire is usually blue.
4. Replace the lid
Once all the connections are ready, it will be necessary to place the cover and leave everything closed. To place the switch, you will have to bend the cables and screw the new mechanism. Then it will only be necessary to fit the frame or trim in the appropriate place.
In the case of recessed base sockets, there are usually no holes to be drilled and after making the connections, it is enough to insert the trim into the metal plate of the mechanism.
5. Check it out
The last step will be to verify that the installation works. It turns on the light again and checks that the result is as expected.
How to change a switch?
We may not want to install a switch from scratch, but a device is already installed and we want to replace it. In that case, some previous instructions would have to be added.
1. Remove the current mechanism
You can remove the frame or bezel using a screwdriver or, if it is snapped on, by placing the tip of the screwdriver between the switch and the wall. Normally the mechanism will have two screws on the sides that you must loosen to remove it.
2. Disconnect the cables
Each wire will be inserted into one of the holes on the back of the mechanism. Depending on the type of switch, to remove the cables it may be enough to press in the indicated area, but you may also have to use a screwdriver.
3. Follow the steps we have indicated
From here, you just have to follow the process that we have indicated above to make the appropriate connections.
Differences between a switch and a switch
In this article, we have shown you how to install a simple switch, although there are other options, such as installing a switch. The main difference between these two devices is that the switches allow the same light to be turned on and off from different points. In this case, we will have to connect three cables instead of two. Remember that if you are not sure, you can always ask for professional help.